Showing posts with label DIY. Show all posts

Tuesday, November 1, 2016

What I Crafted For My Little

I just got done watching the CMA awards and before I head to bed I thought I would share with you what I ended up crafting for my little! I can't remember if I mentioned this before but last week was clue week and then Sunday we had big little reveal which was TONS of fun. So as you can imagine I spent lots of time crafting last week and I thought it would be fun to share with you some of the things I made in case you need ideas at all! I still can't believe I am a big but it was one of the most exciting moments I definitely won't forget! I when it was all said and done I ended up making a canvas, wood letters, picture frame, pin box, and tie blanket. I was really happy with the way everything turned out and I think she liked everything!

Thursday, August 27, 2015

DIY Dorm Decor

I have officially gotten settled into my dorm room!!! Obviously I made it nautical themed because that is my favorite. I will be sharing with you lots of pictures as to how I set up my room soon. Though I am still figuring some stuff out as to where to put things. So today I thought it would be fun to share a DIY dorm decor post. I made one of these for my room and they are super cute. I love them because you can completely customize them. So lets get right into it...


Tuesday, August 19, 2014

DIY Rope Boat Bracelet

Today I am going to show you how to make this SUPER cute bracelet and it's pretty simple. I saw this bracelet on J-crew and similar ones on my trip to Michigan and thought "Hey I can make something like that for way less money". So I headed to Joann and got supplies to make this bracelet. Let me know if you make one in the comments or take a picture and hash tag it #melchicmaydiy on Instagram :) 
J-crew one 
DIY Version: 

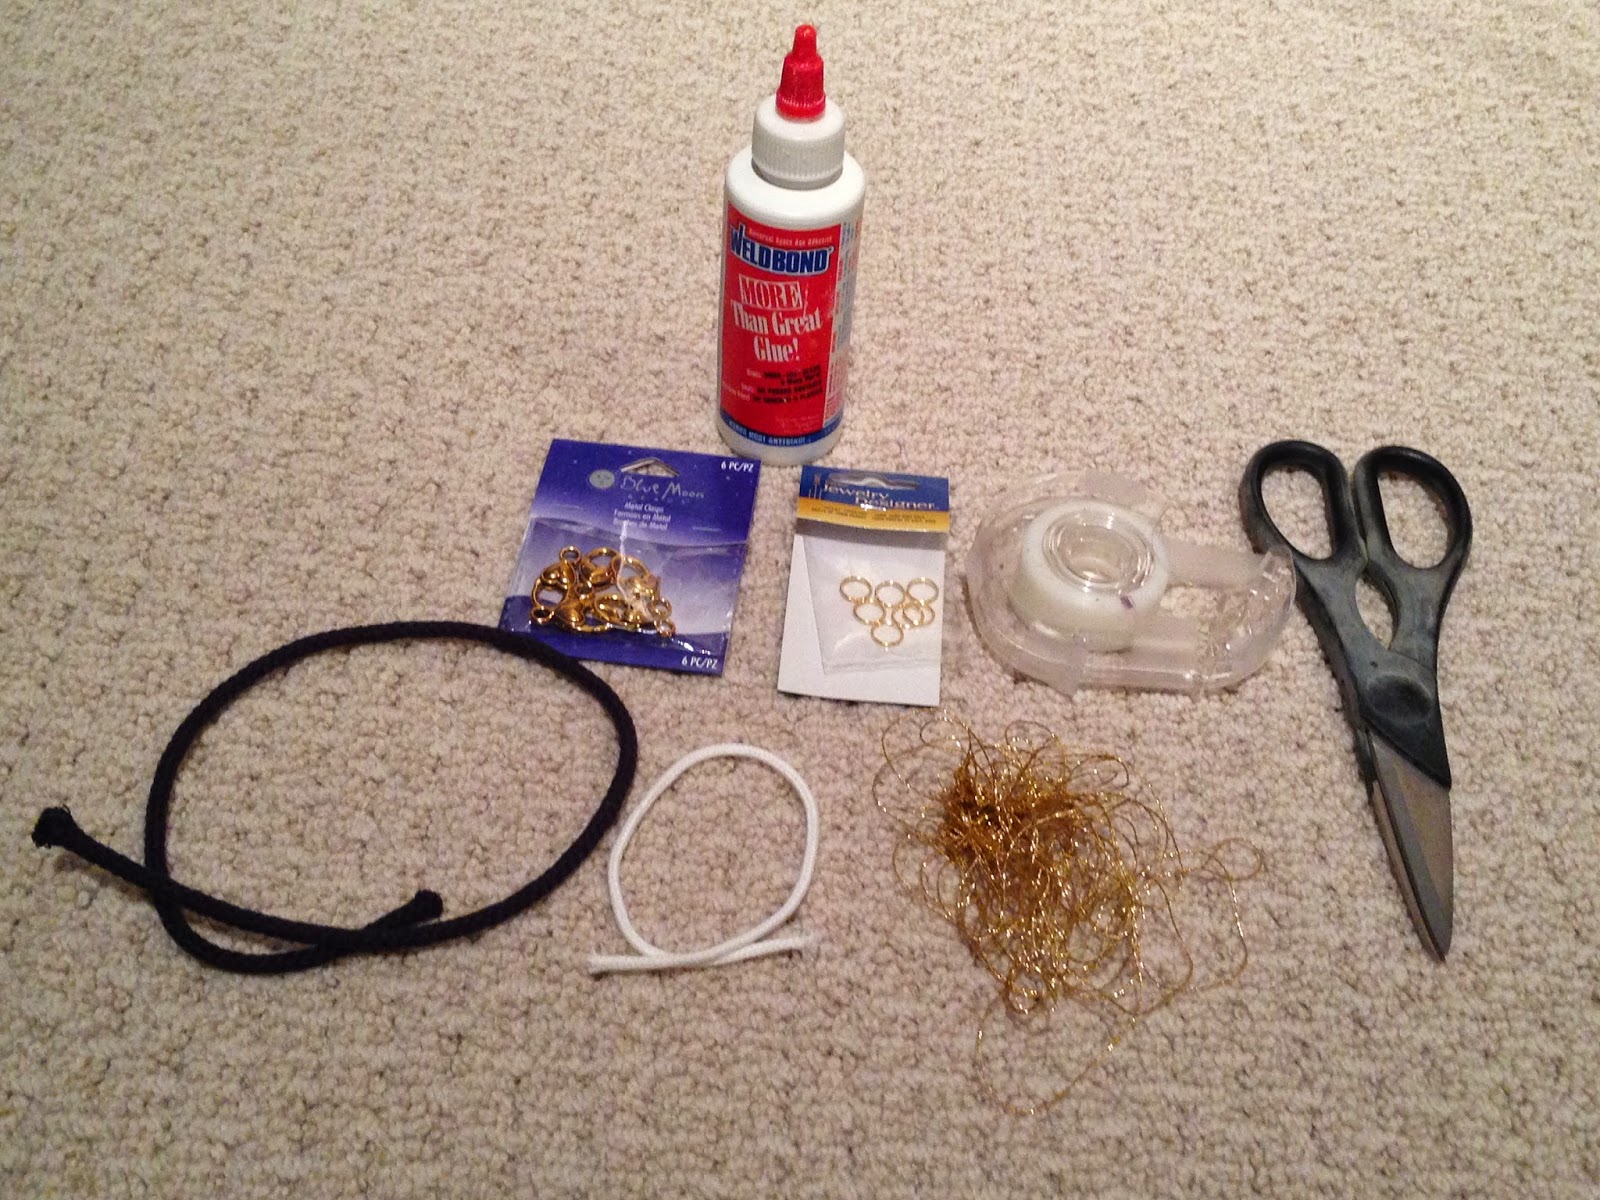
Supplies: 
1. Hot glue or a strong bond glue- I started off using a super type glue but found the hot glue to work the best. 
2. Tape 
3. Scissors
4. Large clasps of your choice- make sure they fit the rope
5. Large jump rings that match the clasps 
6. Thick navy rope- I found mine in the bulk fabric section at Joann
7. Thin white rope- found at Joann as well
8. Thin gold thread 
NOTE 1: When buying the smaller thread make sure it's not to thick (I made that mistake) 
NOTE 2: These bracelets are very customizable because you can pick any color combo you would like 


Step 1: 
Cut the rope to fit your wrist. Leave room for the clasp and make a loop with the rope where the ends meet in the center so there are no knots. 

Step 2: 
Tape the two ends of the rope to avoid fraying


Step 3: 
Add the clasp and jump ring to both sides of the rope 

Step 4: 
Glue the ends of the rope together in the middle so it's even on both sides.


Step 5: 
Wrap the white rope around both sides of the navy rope securing it down with hot glue on the back (the side that would face your wrist). 

Step 6: 
Wrap the gold thread in between the white rope securing if down with glue. This will also hide the glue that is holding the navy rope together. 


Clean up any glue and your DONE :) It sounds complicated but it's really easy!! 


Just an FYI I am getting my wisdom teeth pulled tomorrow :( so I may or may not have a post up for the next few days depending on how I feel. 

Sunday, August 3, 2014

Birthday OOTD: Seersucker

On August 1st I celebrated my 17th birthday. I wore a seersucker dress my sister helped me make this summer considering I am NOT good at sewing. We started this project at the beginning of the summer and I knew I wanted to wear it on my b-day so we had a timeline. This project all began when I saw this Lauren James seersucker dress online. However I did not want to spend over $100 dollars on a dress you can only wear in the summer. Sewing the dress was a lot of work but much less money. Maybe one day I will invest in a seersucker dress but for now I love the one I made :)


 Dress: made (similar) (similar) (similar) / Bow bracelet: made using this tutorial / Necklace: Charming Charlie's / Earrings: Charming Charlie's / Shoes: Aerosoles (similar)  (borrowed from mom) 

About the dress
The pattern was McCall's M6890 and we used C. When we made the dress we did not add the lace front bib. We made a fabric belts to tie around the dress and we shorted the dress to be above the knees. The seersucker fabric and pattern were found at Hobby Lobby.


More B-day pics: 


Summer Rundown #39- August 1st
* Went out for breakfast
* Went shopping at the mall
* Went out for dinner
* Had ice cream cake and opened gifts

Summer Rundown #40- August 2nd 
* Had a dinner picnic on the water
* Cleaned out closets and my room (4 Huge garbage bags full of junk)

Summer Rundown #41- August 3rd 
* Worked on blog stuff before we leave for vacation (#can'twait)
* Caught up on TV shows (#lazyday)

Saturday, July 19, 2014

DIY office space

Yesterday I had this idea of putting a small office space in my room for my computer and to have an area to blog. Though I wanted to spend close to nothing to get a small office area. With the help of some paint, crap in our basement and the target dollar section I managed to pull together a pretty good looking office area.

Step 1: Went to Pinterest for some inspiration (below are some of my favs)


Step 2: I found a white chair and a plastic table in my basement from Wal-mart (similar chair) (same table)

Sorry about the quality of the pics- it was basically dark out when I started this project :) 
Step 3: I bought white spray paint that would work on plastic and metal. I wanted to paint the table and chair so that the metal legs would not show. (same)


Step 3: I went to target and I bought some things in the dollar section- They had all these teal items which match my room perfectly :)  


I also had these fake flowers and ball jar all ready at home


Before: 

After: 


 Prices: 
Table and chair- had
Paper tray- $1
Metal buckets- $3 ($1 each) 
Note pad- $1
Candle- had
Ball jar and flowers- had 
place mat- had
calendar- $13
letter m spray painted- about $10 
White spray paint (2 cans)- $8 total 
Ribbon on chair- had

Total: $36- OMG that was really cheap! 


I hope you enjoyed this little bit different post then my usual. Do you have any thing you want to see on my blog if so comment below? Thanks for reading and I hope you are having a fantastic weekend :)